
I recently answered a message board post from someone wanting the convenience of those pre-ruled comic book pages that you sometimes see for sale in art supply stores, but wondering if there existed a similar product that was actually printed on decent paper. The notoriously fibrous nature of that paper has been a complaint among comics folk for years and as a result I’ve never known any working cartoonist who actually used those pre-lined pages.
I took a quick look at the Blue Line Pro site this morning, though, and it looks like they are now offering pre-lined pages on Strathmore 300, 400 and 500 series bristol board–that paper being pretty much the “industry standard” best bristol around. It’s pricey though: the 2-ply 500 series breaks down to about $4.00 a sheet, vs. $1.88 per sheet if you buy 23″ x 29″ sheets of the exact same paper and just cut it in half yourself.
I’d add one further strike against the pre-lined paper: if you use it, you’re forced to use that 10″ x 15″ page area that people just insist on using. This is a huge pet peeve of mine. I’ve never understood why people so dogmatically insist on not just that particular page size, but on that particular shape. Both the 10″ x 15″ size and the resulting 2:3 vertical-to-horizontal page shape are just the results of historical accidents (the former because of companies trying to save money on house board, the latter owing to the size you get when sheets of standard newsprint were folded and cut to make the first comic books) and, unless you’re doing a monthly serialized book that’s got to fit in those standard comic book racks at your local Android’s Dungeon, there’s no reason–zero–to adhere to this size or shape of page area.
So, if you want to save money on paper and not be confined in how big you work and what page shape you want to use do you have to laboriously measure out your panel grid on each and every page you use? Absolutely not. Here’s a tried and true method for being able to quickly create your panel borders on each page as you work:
Basically, what you do is–at the beginning of your project–you set up your drawing board with guide marks for the grid patterns that you use the most:
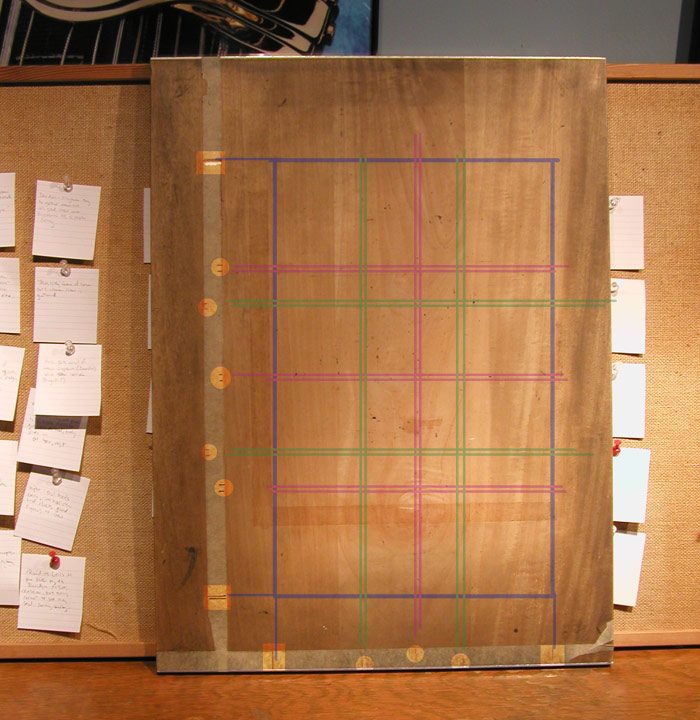
- You start by running two pieces of drafting tape straight down the horizontal and vertical sides of your board, as I’ve done here.
- Then, lining it up with the tape, place a blank page onto the board and tape it down.
- Now, decide what size and shape you want your page’s “live area” to be. In this case (the board is set up for Ameila) I’m working at just under 11″ x 17″, which is about 180% the size the book will be printed at, and just about the maximum size page that will fit on my scanner. I’ve measured that out and marked it on the tape, shown here as the square highlights I’ve added in Photoshop, and similarly outlined the page shape in blue.
- Next, figure out what the grids are that you’ll be using most frequently and mark out those as well on your tape. In my case, I’ve made marks for a standard nine panel grid (Photoshopped on here in green, with tape marks highlighted in circles) and an eight panel grid (in magenta with circular highlights). By using the green horizontal guides and the magenta vertical guides, I can get a standard six panel grid. Note that I’ve got two marks each, which creates the panel gutters.
Once you’ve gone to the trouble of setting that up initially, for each new page you work on, you can just slide your t-square along the vertical edge of your drawing board and create the horizontal panel borders as needed, and likewise slide your t-square along the horizontal edge of the board to create vertical panel borders–a process that takes, literally, just seconds.
(As you can see by the bulletin board in the background, I’m using this time while Amelia‘s off to the editors to do some writing on Oyster War. Act I, peeking out on the left, is coming toghther nicely; Act III on the right… not so much.)
1 ping
[…] And then we have an example of mutipanel layouts, panel organization options and time saving by marking up your drawing board with your preferred layouts. And we haven’t even made it into all the ways you can use the […]